Hidden Snap System
You've heard about throwing away the supplied velcro, well this is true if you plan to wear your armour. You will need something that is stronger which allows the armour to move with your body. I created a system of heavy duty snaps and black elastic. The beauty of this system is that it is hidden and you can take the Armor apart for easy transportation.
Parts required
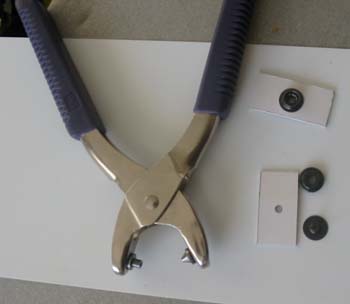
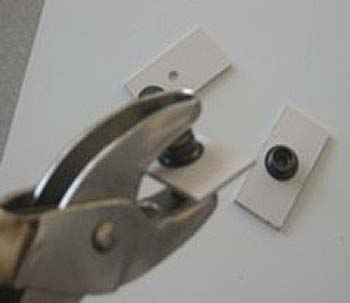
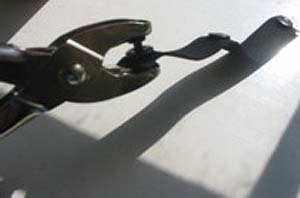
- Vario Pliers or use the plastic snap tool supplied with the poppers.
- ABS plastic sheet *Note (You can also use white ABS or PVC central heating pipe cover available from most DIY stores.) *Note* You can substitube this with squares of canvas webbing.
- ABS Glue or E6000 Glue
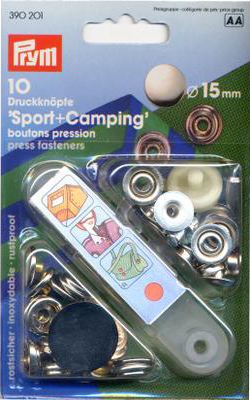
- 3 boxes of '15mm Heavy Duty Sport + Camping Poppers also known as Press Studs (don't buy the cheap ones as they aren't long enough to create a snap through the plastic)
- Black elastic.(2m)
- 1 metre of Webbing 40mm (1 1/2") Black strap polopropolene
In the UK most of this can be brought from John Lewis's, Hobby craft or on-line at Venacavadesign
For my USA buddies try your local fabric store or Lowes or do a search on google for an online supplier for the pliers and snaps.
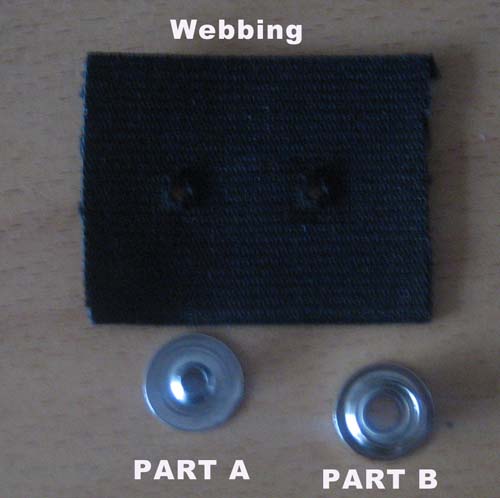
*Note You replace the white square plastic (part c) to simlar size squares in canvas webbing, you must use E6000 for this method.
Step 1
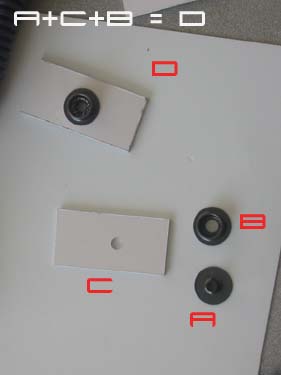
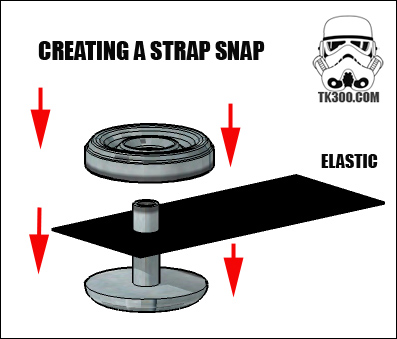
- Drill a hole into a piece of 25mm by 35mm ABS plastic (part C)
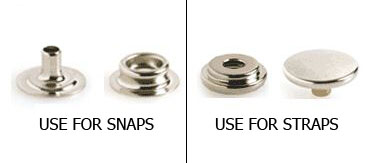
- Place part A (Male) through the drilled hole of Part C
- Then place part B (female) the other side
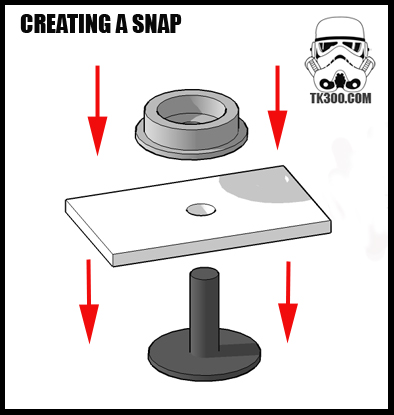
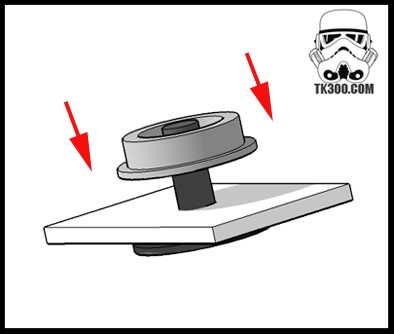
- Using the pliers or plastic snap tool create the male snap (part D)
Step 2
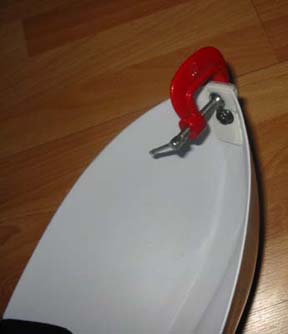
- Shoulder Bells, sand the area where the snap is to be applied, clean and then apply an even layer of ABS glue.
- Attach the snap (flat side down) to one of the shoulder bells, use a clamp to hold and leave to set overnight. Repeat for other shoulder bell .
- Warning ABS cement works by melting (welding) the two ABS pieces together, if you use too much, it will be visible on the exterior (be careful with this glue). Also do not put any ABS glue on the metal part of the popper or inside.
Step 3
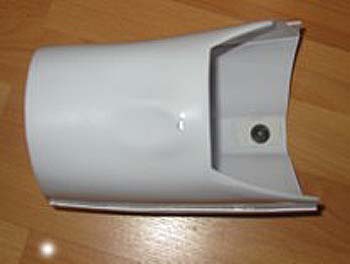
- Biceps, sand the area where the snap is to be applied, clean and then apply an even layer of ABS glue.
- Attach the snap (flat side down) to the bicep (see photo for position), use a clamp to hold and leave to set overnight. Repeat for other Bicep.
Step 4
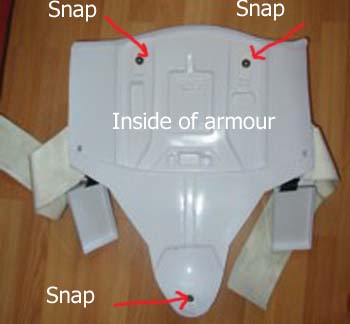
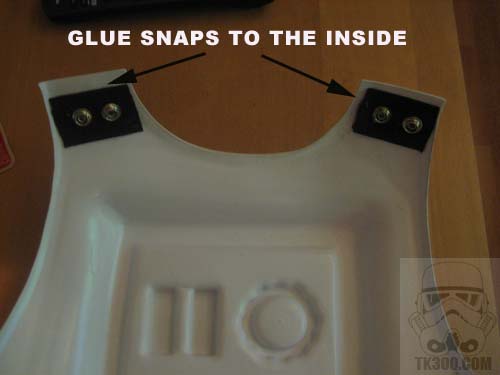
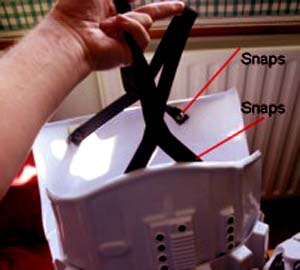
- AB Section, Glue two snaps flat side down at the top "inside" of the upper AB piece . Also glue a snap on the inside of the cod piece (see photo above for placement).
- Clamp these and leave to set over night
Step 5

- Kidney Section, Glue two snaps flat side down at the top "inside" of the upper Kidney piece . Also glue a snap on the inside bottom of the back (see photo above for placement).
- Clamp these and leave to set over night
Step 6
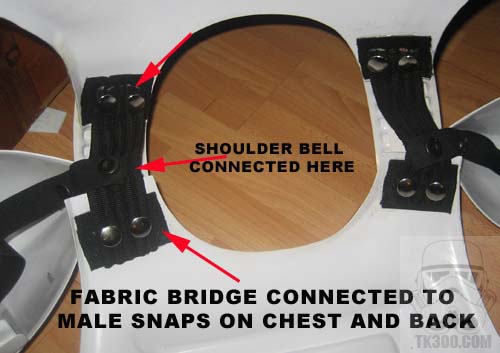
- The following is how to create webbing connection bridges to hold the chest and back armour together. Most armour makers connection bridges are made from HIPS (high impact plastic) and can not take the strain of the movement from the shoulder bells. So it's best to use webbing connection bridges (like the original suits had)
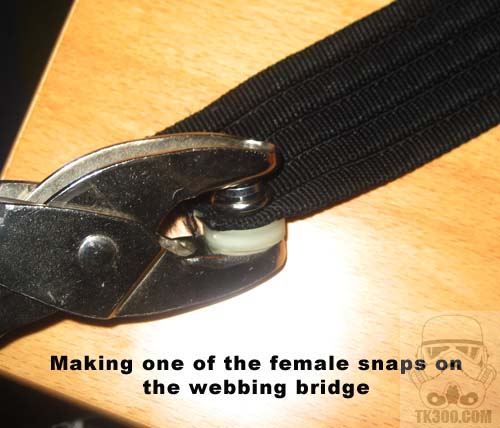
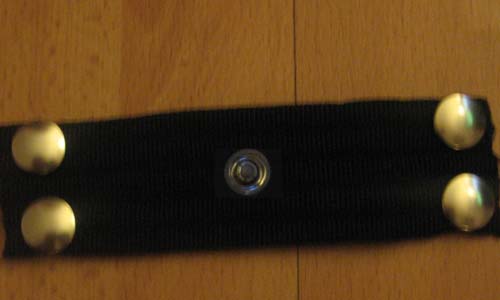
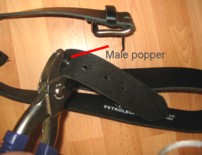
- Here you are creating a male snap, in this section I have used fabric but you can use plastic. So create a snap that can take two male poppers. For my suit I used a square 50mm by 35mm used the method to create the snap as in step one above.
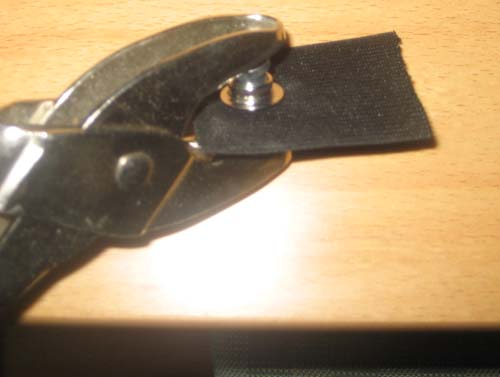
- Above is a photo of the male fabric snap being created with the pliers, you can use the snap tool that comes with the poppers if you havent the pliers.
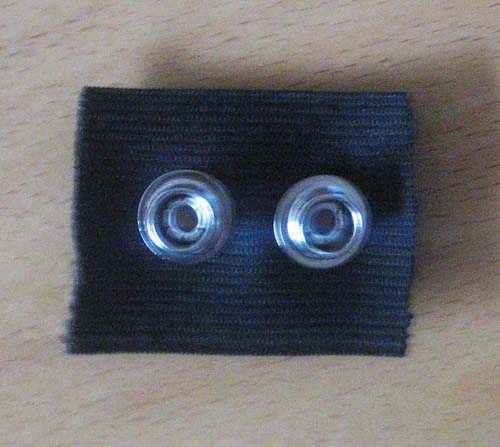
- Above the fabric male snap finished, you need to make two of these.
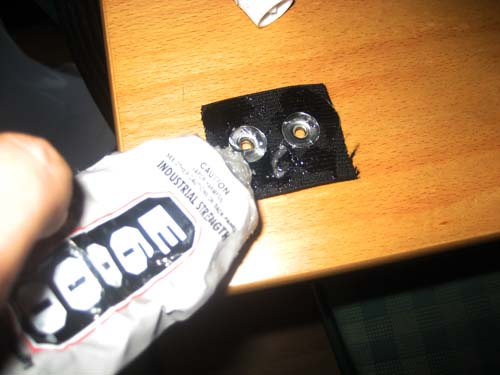
- Once you have created the snap apply the glue, if using fabric you must use E6000 glue.
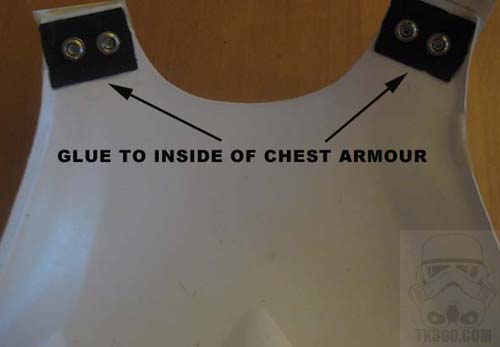
- Above - Glue the snaps (flat side to the plastic) to the top of the "inside" of the chest armour. Allow E6000 glue to dry for 12hours.
- Above - Glue the snaps (flat side to the plastic) to the top of the "inside" of the back armour. Allow E6000 glue to dry for 12hours.
- Get your length of webbing, above I used part of an old rucksack bag but you can use 40mm (1 1/2") Black strap polopropolene (buy from ebay or dressmakers.
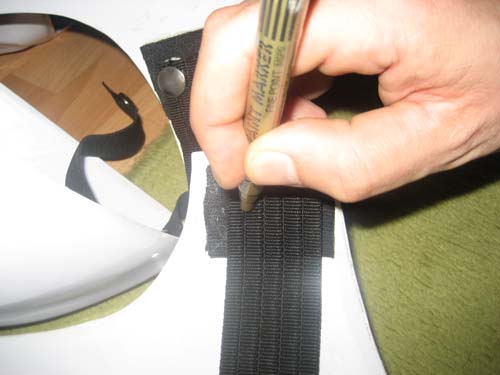
- To find out length you require? Wear the front and back, get someone to measure the length from the back snaps to the chest snaps. Or get someone to place the 40mm webbing and mark the front and back snap positions.
- Once you have the two lengths of webbing cut to your size, place it on top of the male snaps you attached to the chest, using a marker, screwdriver or scissor ends, mark the two holes, where the female poppers will go. Or you can just measure the distance the two male snaps are and transfer that to the webbing straps. repeat above for the back.
- Once you have the holes worked out, attach the female poppers, you require two for each end of the webbing strap. for details on creating female poppers on a strap see step 8 below but use 40mm webbing and two lots of poppers as see in strap on the right (photo below)

- Work out where the shoulders will hang from the strap by connecting the chest and front armour. Mark the position (normally center-ish) then add the male snap. This can be on the top or bottom, here I have the male snap facing down but anyway will work. (see photo above the strap on the left is thefinished article)
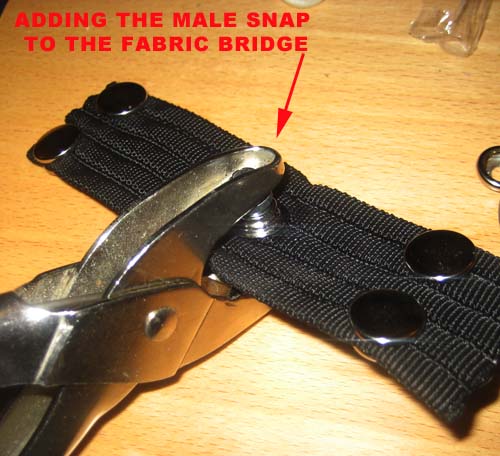
- Photo below shows one of the finished connection bridge snaps. You will require two of these.
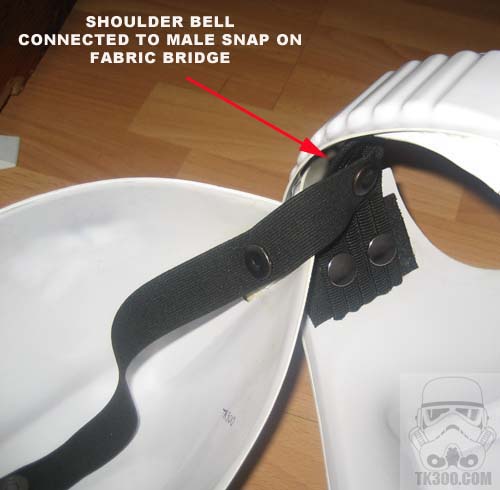
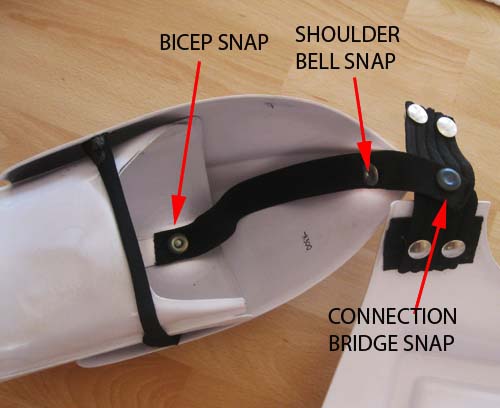
- Below is a photo showing how the shoulder bell connects to the fabric connection strap. For details on creating the 3 way shoulder/bicep elastic strap, see Step 8 below.
- Below shows the finished fabric connection bridges snapped into place holding the front and back armour together
Step 7
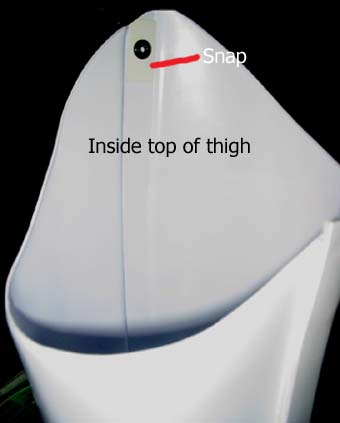
- Glue snaps in the top inside of the front of each thigh, clamp and leave to set overnight.
Step 8 Straps
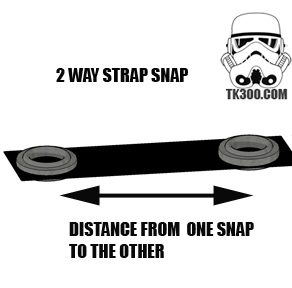
- Make up a 2 way snap to connect cod to butt, belt etc.. you could even add an extra snap to the bottom of the shoulder and use a 2 way to connect the biceps instead of using a 3 way strap below (however using a 3-way creates a flare by raises the shoulders like in the movie.)
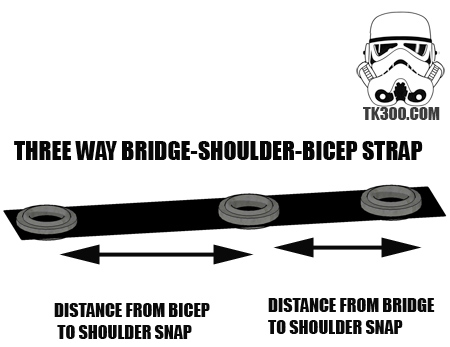
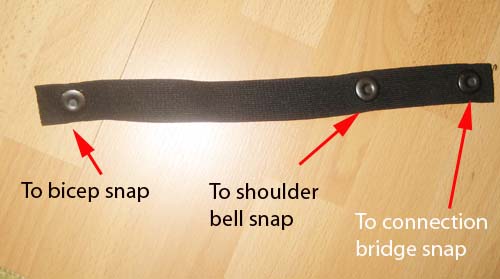
- Wear the top armour (Chest and Back), measure a piece of black elastic that will reach from the connection bridge snap to the shoulder bell snap (mark where this on on elastic) and continue measuring down to the biceps snap (also mark where this is).
Step 9
- Allow a little slack for movement between the shoulder and biceps. Use the Snap tool and insert female poppers into each mark you made on the black elastic
Step 10
- Repeat last step (9) for the other side and connect the black elastic with the female poppers to the corresponding snaps on the armour as seen in the above photo.
Step 11
- You will now end up with an Armour T-Shirt. Notice above the elastic attached to the shoulder bells surrounding the biceps (marked by red lines), this elastic keeps the shoulders in tight against the biceps, I just glued these in place at the edge of the shoulder bell, ABS Glue should do the trick.
Step 12
- Abdominal/Back section - using 2 larger strips of black elastic, insert females poppers at each end and attach to the male snaps you ABS glued on the ab and back plate earlier. I normally cross these straps over, so they do not slip of my shoulders.
Step 13
- Wear the thigh pieces and any canvas or leather belt, (you can even make your own out of webbing and a buckle). Mark on the belt where the male poppers need to go. Using the tool insert the male poppers.
Step 14
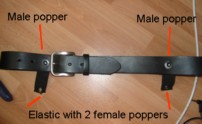
- Wear the thigh pieces and the belt , measure by placing the elastic up against the snaps on the top of the thighs(according to what fits you) Once you have the measurements (distance from snap on belt to snap on thigh), cut 2 pieces of black elastic to length. These will hold the thigh pieces to the belt. Insert female poppers at both ends of the elastic.
Step 15
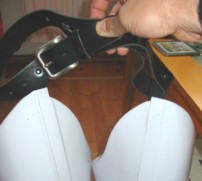
- You will end up with a belt with 2 thigh pieces suspended from it. Using this belt system makes it very easy to put on the armour on. (Below)The suspender belt method is how the thigh pieces were worn in Star Wars.
Step 16 - Finished!!!!
- Now put everything on and test the snap system, do a few poses, walk around making sure the snaps hold. If they don't hold you may need to adjust the length of the elastic. If it does hold, you got your measurements correct, welcome to the elite group of Stormtroopers :-)